Metrological Research and Target Shape Selection in Digital Measuring Systems
Given below are the results of the research project, conducted in order to determine the optimal optical target shape in digital measurement systems using the calculated image center of gravity (CG). In the paper [1] it was shown that it is possible to make a measurement of a target image CG with an error within .00X fractions of a pixel on a standard CCD matrix. Just this very level of accuracy is realized in digital measuring systems, such as digital autocollimators [2].
The objective is to capture the target image coordinates on the matrix of the readings, e.g. on the photosensitive matrix of a CCD-camera or one-dimensional CCD for different measuring tasks. The problem with selecting an optimal shape of the optical target is connected with errors in image CG localization that depends on the image sampling for minor shifts. As an optimal A target shape should be considered optimal, if it allows to minimize the error in CG evaluation.
It is generally known that while the image on the matrix of readings shifts along axis X by  , the Fourier spectrum of the image should be multiplied by the phase term: , the Fourier spectrum of the image should be multiplied by the phase term:

This Fourier transform of the spectrum was used to synthesize digital arrays of images with a given shift.
For carrying out this research we chose three objects, whose details are shown in Fig.1. These objects are the simplest, easiest to manufacture, and can be shaped as diaphragms and targets. For calculation purposes we used a matrix of 512x512, dimensions of details 70х100px (see Fig.1).
Fig. 1

Following set of targets was used to conduct research on the accuracy of the image CG localization (70х100px details).
Object a. Slit with dimensions 7х240px (7 – width, 240 - length). This is an obvious object from visual measurement technologies, which is used in determining the shifting with reference to any given scale.
Object b. Slit with triengle shaped variable transmission, with dimensions 14х200px, whose integral transmission coincides with the transmission capacity of object a. Application of this target in some devices is based on an intuitive perception that sensitivity to image shift can be improved by receiving response from a greater number of cells with different light intensity levels.
Object c. Circle with uniform distribution of transmission, 50px in diameter.
For all three objects we synthesized a digital array of images with shifts renging from 0 to 0.5px, with a step of 0.01px for a 8-bit quantization, which corresponds to 256 intensity levels. It is obvious that shifts from 0.5 to 1 px can be considered equivalent to shifts from -0.5 to 0 px. They mirror the ones investigated and do not deserve any further examination.
Synthesis consisted of the following operations:
1. Calculation of object's Fourier spectrum
 , (1) , (1)
where  is direct Fourier transform is direct Fourier transform
2. Calculation of the image spectrum, which was shifted and blurred by the lens, was performed according to the following formula:
 , (2) , (2)
where 
 is the lens modulation transfer function (MTF) (in calculations MTF of diffraction-limited lens with cutoff spatial frequency 65 mm-1 was used), the exponential factor is a phase shift, which ensures shift of the object by
  . .
3. Calculation of the digital array, which corresponds to the object image, shifted relative to the array of readings by a given value of  , ,
 , (3) , (3)
where  is an inverse Fourier transform. is an inverse Fourier transform.
Metrological research of various target types was conducted in the process of error determination of the image CG measurement for different shifts.
By definition, a measurement error is the difference between the measured and true values of the measurand. In this research the measurands are target image CG coordinates along axis X, which were calculated for digital arrays, generated according to the formula (3). In order to obtain true value, target image CG coordinates along axis X for the initial state (with a zero shift) were calculated, and then shifts  , which are used in the synthesis, were added to these calculated coordinates. , which are used in the synthesis, were added to these calculated coordinates.
Fig.2 shows the behavior of the measurement error of the image CG position for different targets. It is worth mentioning that it is a determined rather than random error which is generated by sampling processes of target image intensity levels.
Fig. 2
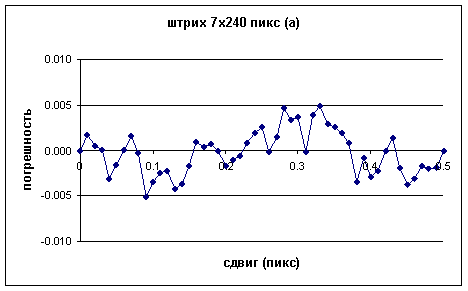
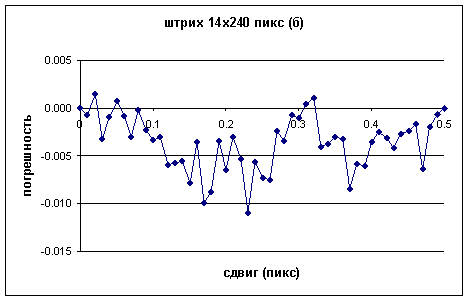
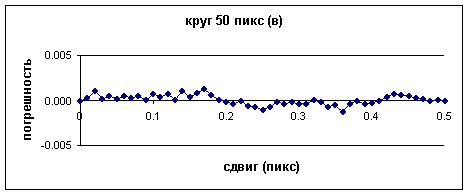
The above figures illustrate the variation of measurement error of image CG position for different targets, shown in Fig.1 fir different shift values. The shift value given in fractions of a pixel along axis X is plotted on the x-coordinate and the measurement error of the image CG position in fractions of a pixel of axis X is plotted on the y-coordinate.
As follows from the graphs, the error spread for target (a) is ± 0.005px, for target (b) – more than ± 0.01px and for target (c) it is ± 0.0013px.
According to this research we can draw a conclusion that in order to minimize the measurement error the following two conditions must be met:
1. Sharp edge of the target (high inclination of the first derivative on the target boundary)
2. Wide variety of intensity levels (wide histogram)
It is obvious that target (a) satisfies only the first condition, target (b) – only the second one and target (c) satisfies both.
In order to increase the intensity levels for target (c) during the implementation of Fourier transform another phase shift by a random value of 0.33px along axis Y was added. It allows to eliminate the readings symmetry in the circle image on axis X.
It should be recognized that target (с) (circle with a diameter of 50px) is an optimal target according to the calculation results and meets the above criteria.
The measurement error value decreases with increasing of the number of quantization levels.
The additional calculations for target (c) showed that a 9-bit quantization (511 intensity levels) cut the measurement error in half, and a 10-bit or higher quantization (1024 levels) does not lead to an appreciable error decrease.
It is obvious, that the above metrological estimates have a significant effect for precision measurements within the .0X and .00x px renge.
The question of noise effect on such measurements is also very important. For one-off measurements the above errors will be diffused by the noise. However, give adequate statistical support, these errors will show up in the measurement results.
We performed a simulation of target (c) CG calculation, taking into account the effect of the additive noise for two shift values: 0.0 and 0.17px. As follows from the lower graph in Fig.2, the shift point 0.17px corresponds to a maximum error of 0.0013px. After overlaying additive white noise with normal distribution and RMS equal to one or two levels of quantization, with the measurement results averaged for 100 or more frames, we received an error of the image CG evaluation in the renge of 0.001±0.0005px, which corresponds to the above calculations. With increasing the level of noise the error begins to deviate significantly from the estimated value. Based on these results we can conclude that it is necessary to use low-noise cameras for precision measurements mentioned above.
Comparison of measurement results for a CCD matrix and a one-dimensional CCD is also a topic of interest. The curves shown in Fig.3 illustrate the error of the target (c) image CG evaluation for the matrix with a 8-bit quantization (256 intensity levels) and a one-dimensional CCD with a 12-bit quantization (4096 intensity levels).
Fig. 3
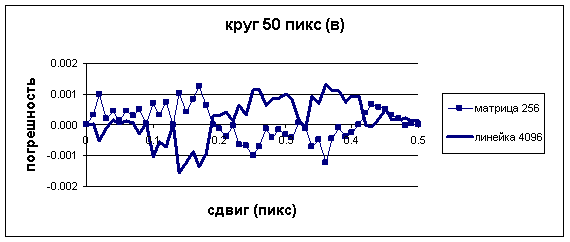
Graphs, which illustrate error of target (c) image CG evaluation for matrix with 8-bit quantization and one-dimensional CCD with 12-bit quantization.
As can be seen from calculation results presented in Fig.3, the measurement error value for both types of sensors in this case is practically the same. A one-dimensional CCD ensures a higher operational speed, but does not have any metrological advantages.
References:
1. Korolev А.N., Gartsuev А.I., "Precision of image positioning on CCD-camera analysis", Izmeritel?naya tehnika, 2004, № 5, с. 20-22.
2. Korolev А.N., Gatscuev А.I., Polishchuk G.S., Tregub V.P., "A Digital Auticollimator", Journal of Optical Technology, V.76, №10, 2009, с.624-628.
Top
|
